recipe

Mustard Apple Pork Tenderloin with Roasted Brussels & Sweet pots

HOLY BONKERS what a week it's been so far! 

I started a new health & fitness program alongside my Live Your F*ck YES life community (follow along my Instagram for the behind the scenes!) and it's been SO amazing.

My favorite part of it all?

ALL THE FOOD I GET TO EAT.

So many health and fitness meal plans involve LIMITING your food (ahem diet mentality). Newsflash diet culture? Eating 1200 calories a day is NOT going to get you healthy.

It WILL perpetuate the endless diet-binge cycle you've been on for yeaaaars. So get your booty aligned with a program that encourages ALL THE FOOD (and I can already tell this is going to be the most INCREDIBLE program ever -- my body is FEELING it in the BEST way!)

One of my favorite ways to prep for a new program is keeping my meals during the day SUPER simple and having my favorite go-tos for dinner as a treat!

And this combo is one of my absolute FAVORITES, and it doesn't hurt that it's hella affordable and super simple (although it tastes restaurant quality if I do say so myself!)

Check 'er out and let me know what you think!

IMG_5609.jpg

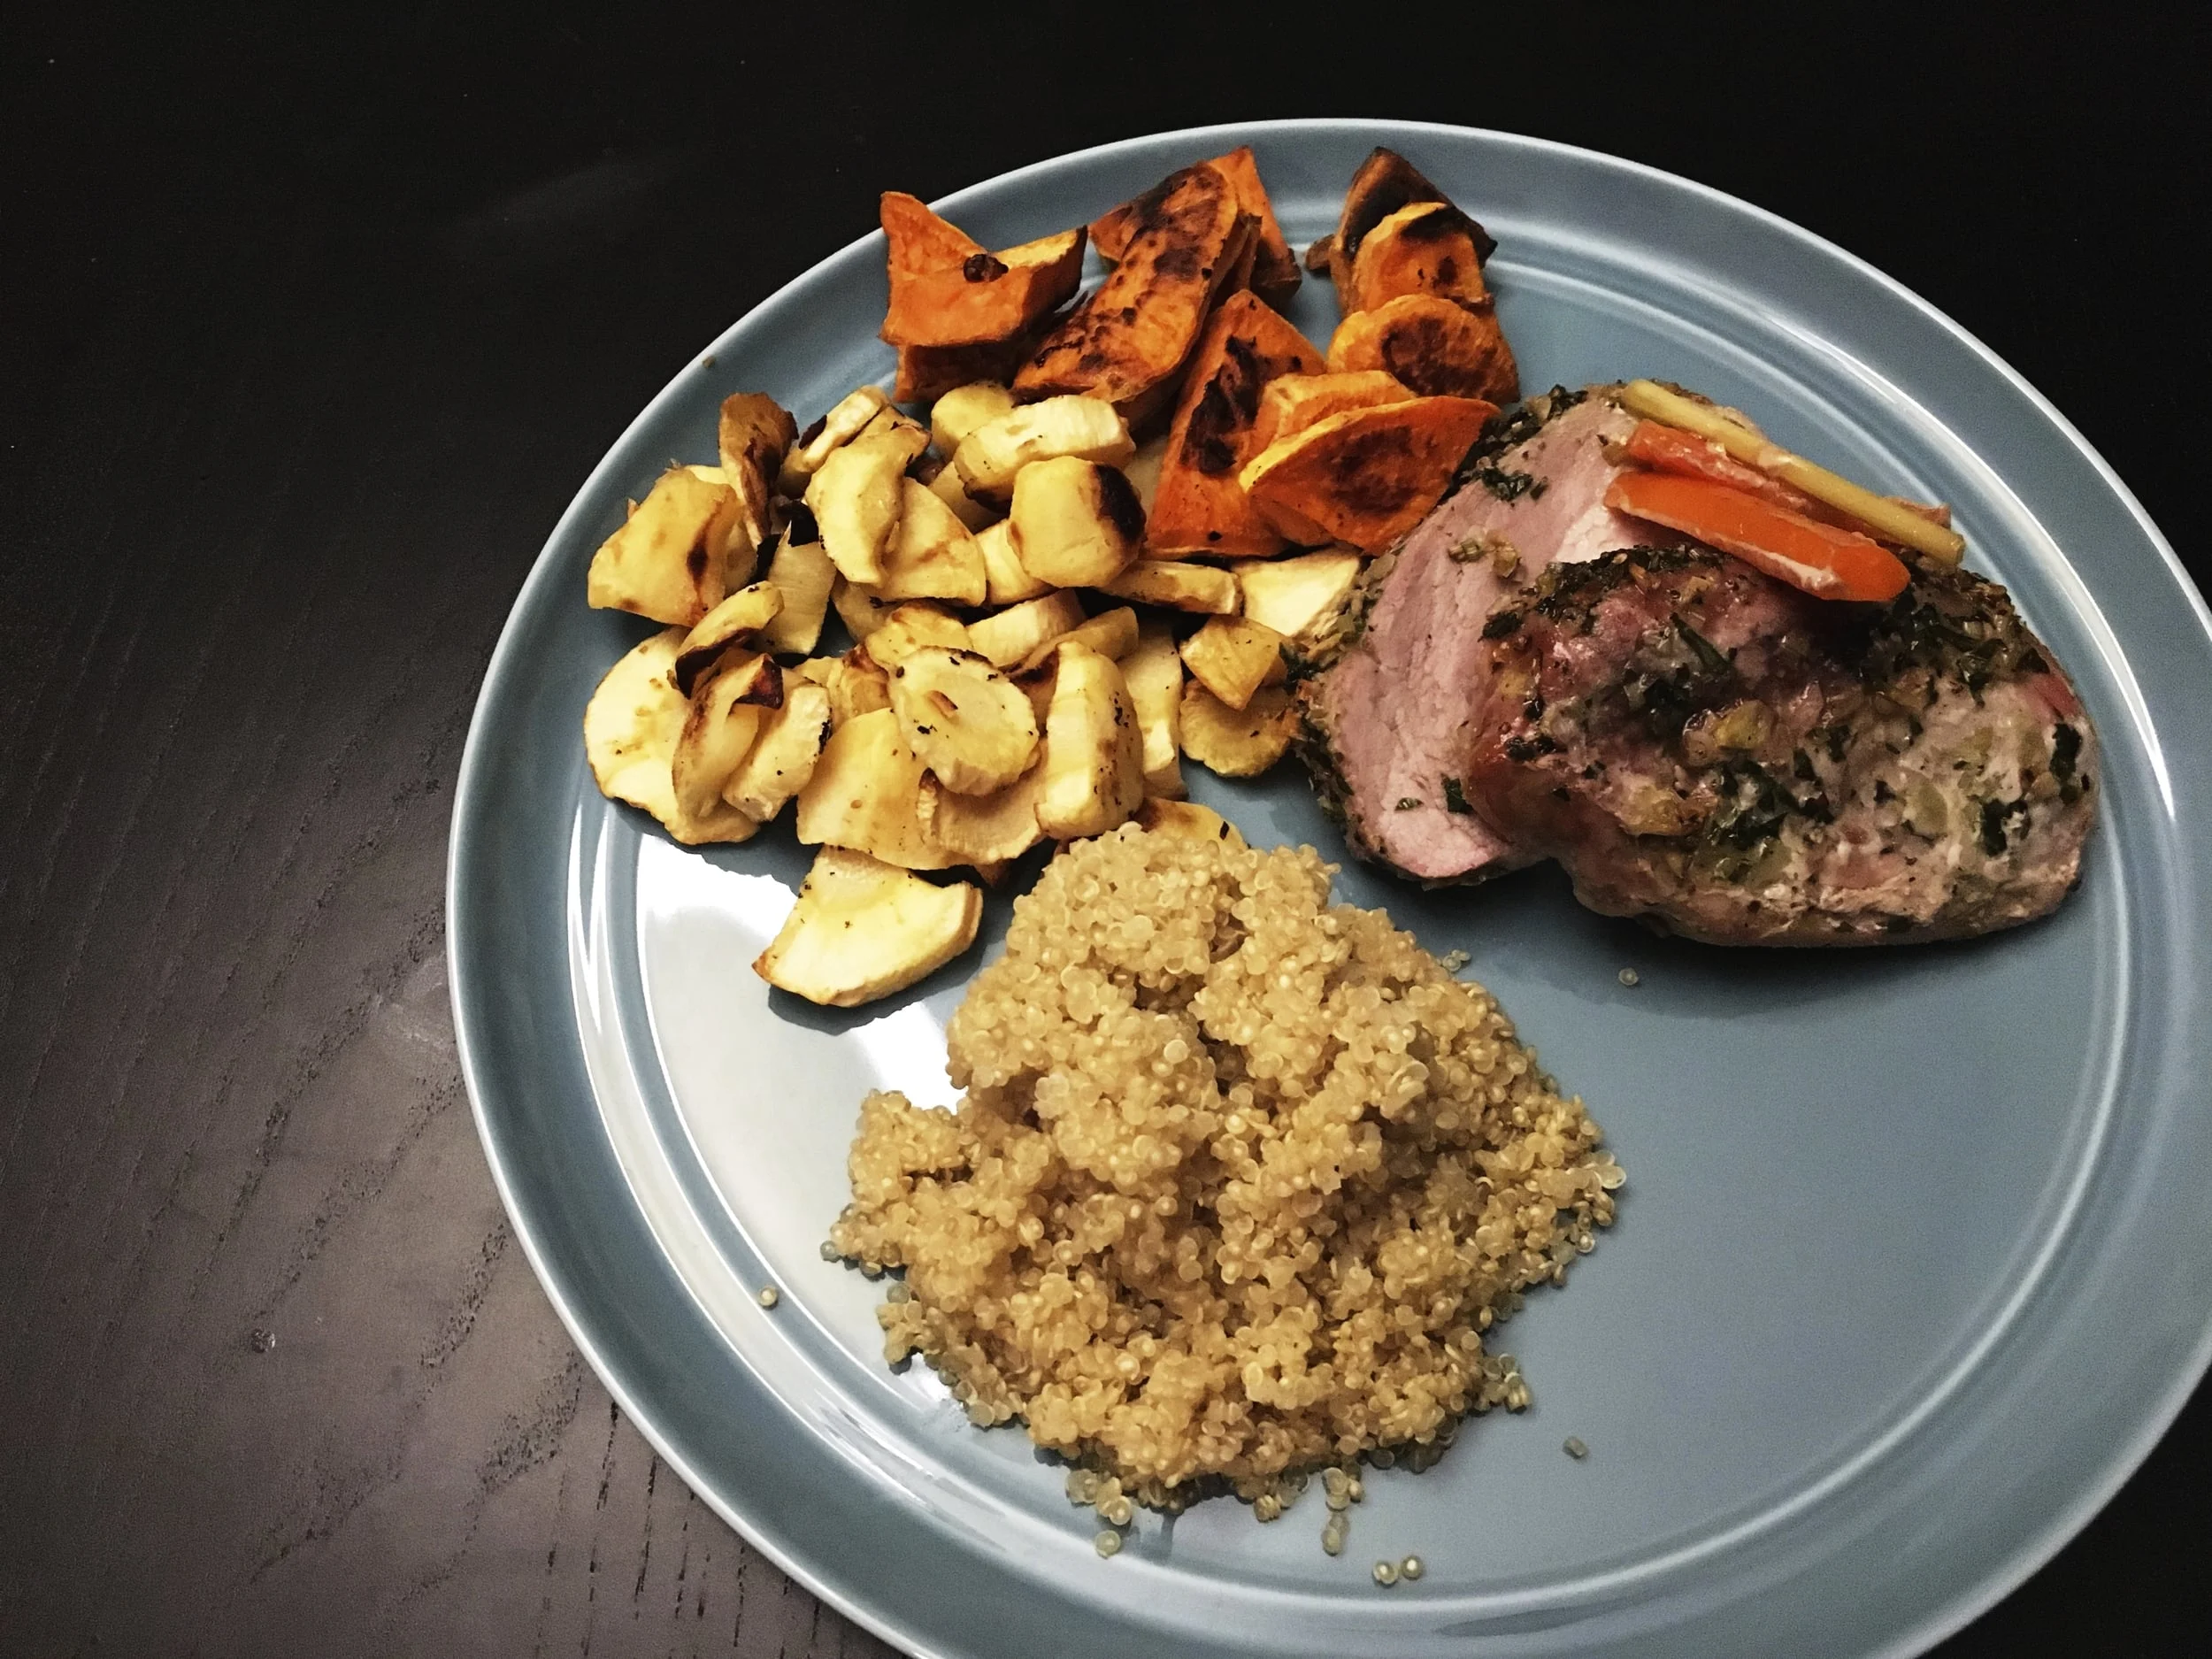
MUSTARD APPLE PORK TENDERLOIN WITH BRUSSELS & SWEET POTS

Serves Four

INGREDIENTS

1 large pork tenderloin (about 15 ounces)

1 tbsp Dijon mustard

1 tbsp whole grain mustard

2 tsp fennel seeds (optional)

1 large onion, sliced

2 medium Granny smith apples, peeled, cored and sliced (about 1/4 inch thick)

1/2 cup of apple cider 

1 tsp grapeseed oil 

2 cups Brussel sprouts

1 sweet potato 

1 tbsp avocado/liquid coconut oil 

DIRECTIONS

1. Preheat oven to 450 degrees F.

2. Season pork with a dash of sea salt and pepper. Season quartered brussel sprouts and chopped sweet potatoes with avocado/coconut oil and sea salt and put in oven for 8-10 minutes. 

3. Heat 2 tbsp of olive oil in large nonstick ovenproof skillet over medium-high heat. Add pork and sear until all sides are brown (about 5 minutes).

4. Transfer pork to plate and cool slightly, spreading combined mustard over top and sides of pork (optional: press fennel seeds into mustard). 54. Add a tbsp of grapeseed oil, onion and apples into pan and sauté over medium heat for about 5 minutes.

6. Place pork on top of mixture and transfer skillet to oven until the centre of the pork registers 150 degrees F, about 15-20 minutes. Transfer pork to platter and make a foil tent to prevent moisture from escaping.

7. Meanwhile, pour apple cider over apple-onion mixture in skillet. Stir over high heat for about two minutes, until slightly reduced. 

8. Slice pork and spoon apple-onion mixture overtop of pork for a nice finish!


What're some of your favorite go to dinners throughout the week?

Spaghetti Squash Pad Thai

Peanuts...... awww squashy squashy .....

you are my pad thai looove and you got me wanting you 🎶 
 

Name that tune?

For real though, whoever said eating healthy meant BORING and time consuming wasn't rocking my meal plan. 


I've been on a mission to create healthy, simple and delicious AF meals for years because let's be honest, I spent YEARS eating just salads as my meals because I just didn't know how else to be healthy.

And it got boring, FAST.

My hubby Kev and I love going out to eat, and when it starts getting chilly outside, what do we love even more? Take out and movie nights.

And while I'm alllll for a good ol' indulgence evening, it's not so good for the budget or the waistline...SO, I set out to create healthy versions of my favorite staples.

And this one is my piece de resistance!!! Healthy pad Thai? I mean can I get an A FREAKING MEN? 

Eat up, my beauts. Hubby approved!

21993155_501360620218536_5828420755329358962_o.jpg

SPAGHETTI SQUASH PAD THAI

4 servings, Prep and Cook time: 45 mins


INGREDIENTS

1 medium spaghetti squash

Tofu, extra firm

4 green onions, diced

2 cups of shredded carrots, blanched

Sprinkle of raw crushed peanuts

1 tbsp coconut oil

Sauce

1/3 cup tamari sauce

1/4 cup peanut butter, creamy unsalted

2 tsp fish oil

2 tbsp chili garlic sauce

lime juice, squeezed from 1/4 of a lime

2 tbsp sesame oil

1/4 cup water


DIRECTIONS

  1. Preheat oven to 375 F.

  2. Chop spaghetti squash in half, place flesh down on a cooking sheet. Add water to the base of the cooking sheet and cover with aluminum foil.

  3. Bake for 30 minutes. Remove foil, flip the spaghetti squash halves and complete baking for 10 more minutes, or until spaghetti squash is at a consistency you desire. (Be sure not to overcook or else it goes to mush!)

  4. While the spaghetti squash is cooking, remove the water from the tofu by pressing down with paper towel. Chop into even cubes and sauté on a medium hot pan with coconut oil.

  5. In a separate pot, combine sauce ingredients on medium-low heat, stirring frequently, adding water as needed to help it from getting too thick.

  6. Once spaghetti squash is cooked, fork out the spaghetti into a bowl. Add carrots and tofu.

  7. Pour as much sauce as you like over the spaghetti squash and mix together to coat. 

  8. Top with chopped green onion and crushed peanuts and voila!


What's your favorite take out order that you wish was healthy?


Spiced Tuna Steaks

Oh baby, baby, how was I supposed to know, this TUNA WOULD BE FIYAHHH.

Ok, ok, all Britney sangin' aside, I've been experimenting a bunch in the kitchen lately because of this amazeballs new meal plan I've been rocking in my Live Your F*ck YES Life challenge!!!

YES, it's a meal plan, but I'm really calling it more of a "fuel plan". It's based on portions and macros and my body has been feeling IN-FUCKING-CREDIBLE. 

I'm allll about intuitive eating and listening to your body, but this type A recovering perfectionist is also ALL about some structure when it comes to my nutrition or else the binge monster comes out to play. So this has been HUGE. And the food is SO FREAKING DELICIOUS.

My mindless snacking is gone, bloating GONE, my skin has cleared up and I not once have felt like I was "on a diet" or "eating clean". You know how much I hate that shiz.

The key? FUEL YOUR BODY. 

Eat shiz that is GOOD for you, and lots of it. 

The weight loss, JOY in your heart and energy is just a rocking side effect ;)

And this bad boy is officially becoming a staple at the Loy household -- you KNOW I'm all about those omega 3s and it's hubby approved sooooo it's staying.

IMG_3487.JPG

SPICED TUNA STEAKS

Serves 4, Prep and Cook time: 25 minutes


INGREDIENTS

4 raw tuna steaks (approx. 1 inch in thickness)

4 cloves garlic, crushed or minced

2 tsp. lemon zest

2 tbsp olive oil

2 fresh tarragon sprigs, chopped

Sea Salt and pepper to taste


DIRECTIONS

  1. Preheat broiler or grill on high

  2. Combine garlic, lemon, tarragon in a bowl and mix well.

  3. Season tuna with salt and pepper. Drizzle with oil & rub spice mixture on the top of tuna steaks.

  4. Grill or broil tuna for 2-4 minutes on each side, or until desired doneness. (I personally like mine a bit more on the rare side so 2 mins per side was perfect!)

  5. Serve with your fave greens & some complex carbs for a full and delicious meal!

Because Burgers can be Healthy Too

With the warm weather starting to hit, I don't know about you but I really start getting the major urge to have a good, juicy burger. So when Kevan suggested that we make our own last week, I was DOWN for the task of finding a way to fit it into my healthy meal plan.

Don't get me wrong, I'm ALL about indulging in the occasional burger, because, let's be honest, Chicago is home to some of the BEST I've ever had, but I was excited to tickle my recipe brain again and see if I could whip up something delicious and that feels indulgent but is actually super healthy!

And I have to say, I'm pretty freaking proud of what I came up with. And it fit completely into my whole foods portion control meal plan that I've been following this month! 

BURGERS FOR THE WIN

Makes 4 Servings

Ingredients

100% Grass fed beef, 1 pound

Whole wheat burger buns (or you could use lettuce!)

2 small Zucchinis

1/2 Spanish Onion

Whole Wheat panko bread crumbs (normal bread crumbs work just fine too!)

Egg whites

1 tbsp Garlic Powder

Italian seasoning (optional)

Sea salt

Pepper

Directions

1. Preheat oven to 400 F and get cover two cookie sheets with aluminum foil

2. Cut zucchini in "fry like" shape and chop onion in half and separate into rings.

3. In bowl, mix together the Bread crumbs, Garlic powder and Italian seasoning. In separate bowl, place 4 egg whites. 

4. Dip each zucchini fry and onion ring in the egg whites. Then, place in the bread crumb mixture, making sure to thoroughly coat before placing on the cookie sheets.

5. Once all of them are coated with bread crumbs, place in the oven for 20-25 minutes (or until browned and crunchy)

6. While the veggies are baking, mix the ground beef with salt and pepper, to taste, before forming them into patties. 

7. About 5 minutes before the fries are ready to come out, start cooking the patties on a heated and oiled cast iron skillet (about 30 seconds per side, if the heat is right) -- also DELICIOUS grilled!

8. Serve on a toasted whole wheat bun (or using a big lettuce leaf as the "bun" if you've had your daily carbohydrates earlier in the day) add mustard, veggies if you like, pickles if you're like me and you're good to go!!!!!!

For my Fixers (per serving): 2 Yellow (if you're using the bun), 1 Red, 1.5 Green

A delicious alternative to "fast food", am I right?

And the BEST PART? All of this cost $6!!!!!!!!!!!! For 4 WHOLE ENTIRE MEALS. Whoever said eating healthy (and deliciously) cost more money than eating out/fast food is a liar I tell you, a LIAR!!!! 


Glazed Asian Mahi Mahi

Les poissons....les poissons...hee-hee-hee hon-hon-hon

If you get that reference, you're officially my favorite. And if you don', that's okay, I still like you, I promise! So I know that I live in the Midwest and all that but here's the thing, this girl likes her Fish. I could probably eat seafood every single day but let's be honest, it's a bit pricey (and thus unrealistic) to be consuming it seven days a week, but I still try to get it in as often as I can. What I love about Mahi Mahi is that it can be prepared so many ways and is relatively inexpensive compared to most other fish, so when I saw it at the grocery store, I just HAD to snag it.

Okay guys. I gotta say, this one's a goodie. I just decided to have fun and test the waters and this really turned out AH-mazing. I mean, I'm not trying to toot my own horn here, but it's delicious and it literally takes 30 minutes, start to finish. If that's not a dream, I don't know what is! Hopefully you guys enjoy it as much as I did! 

Drumroll.......... Duh duh duh duh! 

IMG_7016.jpg

GLAZED ASIAN MAHI MAHI

Makes 2 servings

Ingredients

- 2 Mahi Mahi filets, of equal size

- 1 Tsp of Crushed fresh ginger

- 2 cloves of Garlic, minced

- 2 Tbsp Olive oil

- 3 Tbsp Honey

- 3 Tbsp Balsamic vinegar

- 3 Tbsp Tamari (I use this instead of Soy sauce, but they taste similar)

- 1 Tsp Coconut Oil

- Salt and Pepper to taste

- Optional: 2 Baby bok choi

Directions

1. In a shallow bowl, mix together tamari, honey, balsamic vinegar, ginger, garlic and olive oil. Place fish in bowl & cover and refrigerate for 15 minutes.

2. Meanwhile, wash and separate the leaves from the baby bok choi. Pat dry. [While you're cooking the fish, sautee the baby bok choi in a separate pan on medium heat in a little bit of oil. Cook until tender.}

3. Heat coconut oil in a large skillet over medium-high heat. Remove fish, but hold onto the marinade (to be used later!). Place fish on skillet for approximately 5 minutes on each side, ensuring that you turn it only once. Once the fish flakes easily with a fork, remove from heat to a serving platter and keep warm.

4. Pour saved marinade into the skillet and heat on medium-heat until it turns into a glaze like consistency. Spoon glaze over fish and voila! 


Our Adventure In Making LemonGrass & Basil Pork Tenderloin

My hubby and I are huge foodies (if you can't tell by all of the recipes I post!!), and for Christmas, he got me this amazing gift called Foodie Dice & we finally decided to put them to good use and holy wow was this meal amaze-balls!!!!

Basically, how it works, is that you get a variety of wooden dice, each belonging to a different category (protein, side dish, veggie, spice, extra ingredient etc.) And then you just ROLL the dice and it tells what ingredients to use for your next meal. Simple, fun, and it makes making dinner together an adventure! 

So we hopped in the car, went to the store to buy all the ingredients, and THIS is what we created :) Seriously, I've been eating leftovers from this meal for the past two days and it still hasn't gotten old. Definitely going to be a new staple in our house!

LEMONGRASS & BASIL PORK TENDERLOIN

Makes approx. 4 servings

Ingredients

- Pork tenderloin (we got a 2 lb one but really any size will work)

- 1 stalk Lemongrass, minced

- Garlic cloves, crushed (the more the merrier, as far as I'm concerned)

- A handful of basil leaves, minced

- 4 Tbsp Olive Oil

- Pinch of Sea Salt

Optional side ingredients:

- Large Sweet potato, peeled and sliced

- 2 parsnips, peeled and sliced

- 1 cup Quinoa

Directions

1. Preheat oven to 350 degrees F. In small bowl, combine olive oil, lemongrass, garlic, basil and sea salt. Once mixed thoroughly, place a thick coat on top of the pork. Let sit for 5 minutes.

2. Meanwhile, combine the sweet potato and parsnips in a large bowl. Drizzle some olive oil and remaining garlic over top & then place the veggies onto a cookie sheet covered in aluminum foil.

3. Place pork into casserole dish & cover it. Place pork and veggies into the oven until pork has reached an internal temperature of 145 degrees F, and no longer has a pink centre. (About 30 minutes per pound) Make sure to keep an eye on the veggies -- we like them a bit crispy on the outside, so I tend to leave them in a bit longer!

4. About 15 minutes before the pork is ready to come out, start cooking your quinoa. Combine quinoa and 2 cups of water into a pot over high heat. Once it boils, reduce heat to low and place the lid on top of the pot, leaving it slightly ajar.

_________________________________________________________________________________

Annnnd Presto! Your meal is complete and oh so delicious!

Would love to know how you liked it! Leave your comments below!

Shrimp Tacos

If you've been following my blog, you know that things have been a little stressful in the Loy household as of late. Hooray for water damage! (...Said nobody ever) So when I knew that my husband and I both had the night off, I decided to put my worries about all this into something productive -- cooking! I love coming up with new & healthy recipes and trying them on my husband. He is the most honest person I've ever known so I always know that when he says it's good, he means it! And this one got 5 gold stars. He even asked when we could have it again. If that's not a win, I don't know what is!

The best part? This took me a total of 30 minutes, prep and cook time together! Delicious, quick and fun to eat -- that can't be beat. (See what I did there? I'm a rhyming queen, guys.)

SHRIMP TACOS

Makes 2 Servings (4 tacos total)

Ingredients

- 10 Raw Shrimp

- 4 Corn Tortilla Shells

- 1/4 Small Spanish or White Onion, chopped

- 1/2 Avocado, sliced

- Sprinkle of Chopped Purple Cabbage

- 1/2 Lemon

- 1 Tbsp Olive Oil

- 1 Tsp Cumin

- 1/2 Tsp Garlic Powder

- Ground Pepper

- Sea Salt

Directions

Peel & devein raw shrimp. Rinse under cold water.

Combine oil, spices, and lemon juice from lemon in bowl and combine with shrimp. Make sure shrimp is coated with the spice mix.

Sautee onion in a little olive oil on medium-high heat. In separate pan on medium heat, place tortilla shell down for one minute and then flip. Repeat for all four tortilla shells. This heats them up nicely for you!

Once onions are translucent, add shrimp to pan. Cook about 2 minutes per side.

Add your shrimp and onion mix onto your taco shell, topping with avocado & purple cabbage for some extra crunch and voila, your taco is ready to be devoured!


The Cookie to win all Potlucks

Holy wow, how is Christmas next week? Is it just me or do you feel like it literally snuck up on us more than usual this year. Normally, I've got a countdown going starting in November, and I'm listening to Christmas songs wayyyy earlier than any normal human being should. For reals, guys, Christmas is my holiday. I get just giddy thinking about it.

But for some reason, this season thus far has felt really different. And I've been thinking a lot about why that's the case. For one, the weather has been so out of whack here in Chicago. It has snowed once and it was over a month ago, so I don't feel like that really counts. And it has been unusually warm. I seriously keep thinking it's November. Nope, definitely December, Amanda. Definitely December. Also, I feel like I normally have had holiday parties to attend and Christmas-y get togethers and so far this year, I haven't really had one. [No, this is not me throwing myself a pity party, it's just the cold hard facts. People are slacking on the Christmas parties up in my hood! What's a girl gotta do to have a reason to break out the tacky Christmas sweaters with the pompoms on them? *Le Sigh*]

So yeah, long story short, it has just not felt like Christmas. 

And I was getting really bummed out about it all. But here's the thing. Christmas/Channukah/Kwanza/whatever you may celebrate isn't about the parties you go to or the snowstorm that comes your way. It's about a feeling. A feeling that just doesn't seem to exist at any other time of the year. For me, it's this heart-fluttering-giant-smiles-giving-warm-fuzzy-joy-feeling inside my soul. And goddamnit I wanted that feeling!!

So, I blasted my Ella Fitzgerald Christmas cd, turned on the Christmas lights, got Christmas cookies baking in the oven and got all of my presents wrapped. And there was that feeling.

So, I guess all of this is to say that if your life isn't bringing you the holiday warm and fuzzies, make them appear. You know what makes you giddy, so do those things and give yourself some holiday lovin'. You deserve it.

OK, now for the Good Stuff.

THE ULTIMATE POTLUCK COOKIE

I love these cookies. They are so healthy and a constant hit at any and all potlucks I attend. People have no clue that they're eating a cookie that is good for them AND delicious! Bonus? They literally take 5 minutes to make, easy, peasy, cookie!

Ingredients

2 bananas

1 cup oats

1/4 tsp vanilla

1 tsp pumpkin pie spice (or 1 tsp cinnamon & 1/4 tsp nutmeg)

Dark chocolate

Optional: walnuts 

Directions

1. Preheat oven to 350 degrees F.

2. In large bowl, mash bananas until consistency is smooth

3. Stir in oats until completely mixed together

4. Add pumpkin spice and vanilla and mix until it is evenly covered. Then add dark chocolate chunks/chips and optional walnuts and do the same.

5. Using a tablespoon, spoon cookie mix onto a cookie sheet

6. Bake for 12-15 minutes, or until cookie is baked to your desire! 


Asian Inspired Veggie Medley

I have been on an Asian food kick lately -- well, really all my life I guess, but for the past few years, I didn't really think I could incorporate Asian food into my diet in a healthy way {other than stirfry, but let's be honest, a girl gets tired of stirfry after a while, am I right?}

When  I was a kid, we did take out once a week, every Friday night. It was our family night (something I plan on incorporating into my family when we have kids of our own) & I looked forward to it every week. We would order from this little hole in the wall Chinese restaurant and I would fill my tummy with plain lo mein noodles, beef & broccoli and chicken wings. All, of course, while playing a very intense round of Sorry, Clue or whichever board game we were obsessed with at the time.

And while I am all for takeout every once in a while {the past few years, I have become a huge Indian food fan. Holy wow their veggie entrees are amazeballs}, when I started becoming more conscious of my health, I was so taken back by the lack of nutritional value found in Chinese food. So, for a long time into my quest towards a healthier me, I stuck to very simple clean meals. Boiled or baked chicken, steamed vegetables, the occasional brown rice or quinoa. But guess what? Turns out eating like that gets old FAST, and I've learned that eating healthy doesn't mean eating boring foods. It has actually opened up a world of spice and unique blends of ingredients that have changed my world and my relationship to food.

For all of my Chinese foods lovers (and veggie/vegan heads), this might be the recipe for you.

Asian Inspired Veggie Medley

Makes 2 servings

Ingredients

- 2/3 of Cooked quinoa 

- 4 big handfuls of brussel sprouts, ends cut off and chopped in half (in my opinion, you can never have enough)

- 1/2 head of a small red cabbage, sliced 

- 2 tbsp. Sesame oil

- 1 tbsp. Rice vinegar

- 1 tsp. Tamari (a lower sodium version of Soy Sauce)

- Optional: Any other veggies you love (ex. water chestnuts, shredded carrots), Extra firm Tofu, sesame seeds

Directions

Heat 1 tbsp of Sesame oil in a skillet on medium to medium high heat. {If using tofu, press the water out of it by using a paper towel and applying pressure. Then cut into cubes and sear in skillet until brown on both sides}. If you're not using tofu, toss the brussel sprouts into the skillet for 5-7 minutes.

Meanwhile, have your quinoa cooking in a separate pot. My personal preference for cooking it? Add uncooked quinoa and double the amount of water into a small pot. Turn on high heat until it reaches a boil & then put heat to low and cover until water is gone (usually about 7-10 minutes).

In a separate bowl, add remaining sesame oil, rice vinegar and tamari.

Once the brussel sprouts have started to brown, add the red cabbage (and any optional additional veggies). Let cook for 2 minutes before adding remainder of the sauce. Let simmer until vegetables are cooked to your liking. Personally, I like them not to lose all of their crunch so I let it go for 3-5 minutes more.  If you're feeling fun, sprinkle some sesame seeds overtop of the medley the last minute that they are cooking!

In a bowl, place 1/3 cup cooked quinoa and half of the veggies and VOILA, you've got a nutritious & delicious Asian inspired meal!


My Hubby's Chili

It is getting colder and the holidays are upon us! Maybe it's the Canadian in me, but I love this time of year. The first snowfall. Christmas lights. Hot chocolate. Big chunky wool scarves. It's all so magical. It's always around this time of year that I start craving comfort foods. And for me, one of my favorite comfort foods in the winter months has always been Chili. It's just leaves you feeling so warm & cozy.

I'm a lucky lady. My hubby is an amazing cook, and he has taught me a lot about being unafraid to spice things up in the kitchen. And holyballs his Chili is amazing. And best of all? It's HEALTHY! *cue the applause* I would be doing you all a huge disservice if I didn't share the amazingness of this recipe because man, oh man, you won't know what hit you. 

Chili of the Gods

Makes 4-6 Servings

Ingredients

- 16 oz of Ground Turkey /or/ Ground Grassfed beef 

- 2 cans of Crushed tomatoes

- 2 Serrano peppers

- 1 Jalapeno pepper

- 2 cans of Kidney beans, rinsed

- 1 large onion, diced

- 3-5 cloves of garlic, minced (We like lots of garlic, so feel free to put less if it's not your thing)

- Seasonings: Cayenne, Cumin, Chili powder, Oregano

- Optional: carrots, red peppers

Directions

Heat 2 tbsp of coconut/olive oil in a large pot on medium-medium high heat. Add onions and cook until it is soft and translucent, about 3-5 minutes. Add in the meat and break it up as it browns. Clear a space in the middle of the pot & add in garlic, hot peppers and other optional veggies. Cook until garlic is fragrant, about a minute, and then stir into the meat and onions. 

Add seasonings to your liking. We like things well spiced, so our measurements are usually 1 tbsp Cayenne, 2 tbsp chili powder and oregano and 3 tbsp of cumin. A pinch of sea salt for good measure is also 100% an option!

Add crushed tomatoes and kidney beans to the pot and stir until mixed together. 

Reduce heat to low and allow to simmer for no less than 30 minutes. It's important to let it simmer so that all of the flavors mix together properly! Trust me, THAT'S the secret to a perfect chili.


Bonus? If you're cooking for two, you have leftovers for the week! Double bonus? Your belly is happy and you've made yourself a nutritious meal! What could be better?